Views in ASP.NET Core MVC
By Steve Smith and Dave Brock
This document explains views used in ASP.NET Core MVC applications. For information on Razor Pages, see Introduction to Razor Pages in ASP.NET Core.
In the Model-View-Controller (MVC) pattern, the view handles the app's data presentation and user interaction. A view is an HTML template with embedded Razor markup. Razor markup is code that interacts with HTML markup to produce a webpage that's sent to the client.
In ASP.NET Core MVC, views are .cshtml files that use the C# programming language in Razor markup. Usually, view files are grouped into folders named for each of the app's controllers. The folders are stored in a Views folder at the root of the app:
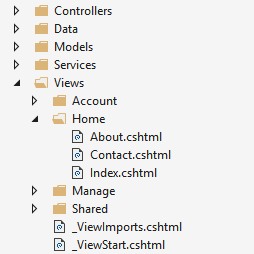
The Home controller is represented by a Home folder inside the Views folder. The Home folder contains the views for the About, Contact, and Index (homepage) webpages. When a user requests one of these three webpages, controller actions in the Home controller determine which of the three views is used to build and return a webpage to the user.
Use layouts to provide consistent webpage sections and reduce code repetition. Layouts often contain the header, navigation and menu elements, and the footer. The header and footer usually contain boilerplate markup for many metadata elements and links to script and style assets. Layouts help you avoid this boilerplate markup in your views.
Partial views reduce code duplication by managing reusable parts of views. For example, a partial view is useful for an author biography on a blog website that appears in several views. An author biography is ordinary view content and doesn't require code to execute in order to produce the content for the webpage. Author biography content is available to the view by model binding alone, so using a partial view for this type of content is ideal.
View components are similar to partial views in that they allow you to reduce repetitive code, but they're appropriate for view content that requires code to run on the server in order to render the webpage. View components are useful when the rendered content requires database interaction, such as for a website shopping cart. View components aren't limited to model binding in order to produce webpage output.
Benefits of using views
Views help to establish separation of concerns within an MVC app by separating the user interface markup from other parts of the app. Following SoC design makes your app modular, which provides several benefits:
- The app is easier to maintain because it's better organized. Views are generally grouped by app feature. This makes it easier to find related views when working on a feature.
- The parts of the app are loosely coupled. You can build and update the app's views separately from the business logic and data access components. You can modify the views of the app without necessarily having to update other parts of the app.
- It's easier to test the user interface parts of the app because the views are separate units.
- Due to better organization, it's less likely that you'll accidentally repeat sections of the user interface.
Creating a view
Views that are specific to a controller are created in the Views/[ControllerName] folder. Views that are shared among controllers are placed in the Views/Shared folder. To create a view, add a new file and give it the same name as its associated controller action with the .cshtml file extension. To create a view that corresponds with the About action in the Home controller, create an About.cshtml file in the Views/Home folder:
@{
    ViewData["Title"] = "About";
}
<h2>@ViewData["Title"].</h2>
<h3>@ViewData["Message"]</h3>

<p>Use this area to provide additional information.</p>
Razor markup starts with the @ symbol. Run C# statements by placing C# code within Razor code blocks set off by curly braces ({ ... }). For example, see the assignment of "About" to ViewData["Title"] shown above. You can display values within HTML by simply referencing the value with the @ symbol. See the contents of the <h2> and <h3> elements above.
The view content shown above is only part of the entire webpage that's rendered to the user. The rest of the page's layout and other common aspects of the view are specified in other view files. To learn more, see the Layout topic.
How controllers specify views
Views are typically returned from actions as a ViewResult, which is a type of ActionResult. Your action method can create and return a ViewResult directly, but that isn't commonly done. Since most controllers inherit from Controller, you simply use the View helper method to return the ViewResult:
HomeController.cs:
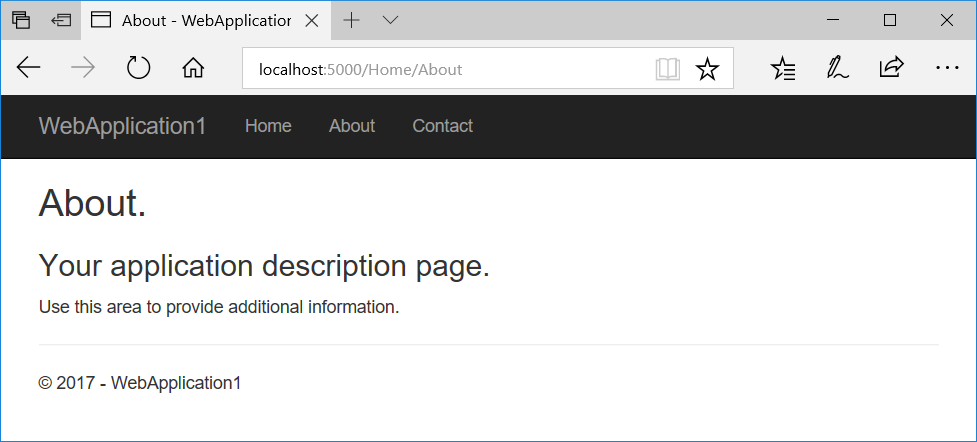
public IActionResult About()
{
    ViewData["Message"] = "Your application description page.";

    return View();
}
When this action returns, the About.cshtml view shown in the last section is rendered as the following webpage:
The View helper method has several overloads. You can optionally specify:
An explicit view to return:
return View("Orders");A model to pass to the view:
return View(Orders);Both a view and a model:
return View("Orders", Orders);
View discovery
When an action returns a view, a process called view discovery takes place. This process determines which view file is used based on the view name.
The default behavior of the View method (return View();) is to return a view with the same name as the action method from which it's called. For example, the About ActionResult method name of the controller is used to search for a view file named About.cshtml. First, the runtime looks in the Views/[ControllerName] folder for the view. If it doesn't find a matching view there, it searches the Shared folder for the view.
It doesn't matter if you implicitly return the ViewResult with return View(); or explicitly pass the view name to the View method with return View("<ViewName>");. In both cases, view discovery searches for a matching view file in this order:
Views/\[ControllerName]/\[ViewName].cshtmlViews/Shared/\[ViewName].cshtml
A view file path can be provided instead of a view name. If using an absolute path starting at the app root (optionally starting with "/" or "~/"), the .cshtml extension must be specified:
return View("Views/Home/About.cshtml");
You can also use a relative path to specify views in different directories without the .cshtml extension. Inside the HomeController, you can return the Index view of your Manage views with a relative path:
return View("../Manage/Index");
Similarly, you can indicate the current controller-specific directory with the "./" prefix:
return View("./About");
Partial views and view components use similar (but not identical) discovery mechanisms.
You can customize the default convention for how views are located within the app by using a custom IViewLocationExpander.
View discovery relies on finding view files by file name. If the underlying file system is case sensitive, view names are probably case sensitive. For compatibility across operating systems, match case between controller and action names and associated view folders and file names. If you encounter an error that a view file can't be found while working with a case-sensitive file system, confirm that the casing matches between the requested view file and the actual view file name.
Follow the best practice of organizing the file structure for your views to reflect the relationships among controllers, actions, and views for maintainability and clarity.
Pass data to views
Pass data to views using several approaches:
- Strongly typed data: viewmodel
- Weakly typed data
ViewData(ViewDataAttribute)ViewBag
Strongly-typed data (viewmodel)
The most robust approach is to specify a model type in the view. This model is commonly referred to as a viewmodel. You pass an instance of the viewmodel type to the view from the action.
Using a viewmodel to pass data to a view allows the view to take advantage of strong type checking. Strong typing (or strongly typed) means that every variable and constant has an explicitly defined type (for example, string, int, or DateTime). The validity of types used in a view is checked at compile time.
Visual Studio and Visual Studio Code list strongly typed class members using a feature called IntelliSense. When you want to see the properties of a viewmodel, type the variable name for the viewmodel followed by a period (.). This helps you write code faster with fewer errors.
Specify a model using the @model directive. Use the model with @Model:
@model WebApplication1.ViewModels.Address

<h2>Contact</h2>
<address>
    @Model.Street<br>
    @Model.City, @Model.State @Model.PostalCode<br>
    <abbr title="Phone">P:</abbr> 425.555.0100
</address>
To provide the model to the view, the controller passes it as a parameter:
public IActionResult Contact()
{
    ViewData["Message"] = "Your contact page.";

    var viewModel = new Address()
    {
        Name = "Microsoft",
        Street = "One Microsoft Way",
        City = "Redmond",
        State = "WA",
        PostalCode = "98052-6399"
    };

    return View(viewModel);
}
There are no restrictions on the model types that you can provide to a view. We recommend using Plain Old CLR Object (POCO) viewmodels with little or no behavior (methods) defined. Usually, viewmodel classes are either stored in the Models folder or a separate ViewModels folder at the root of the app. The Address viewmodel used in the example above is a POCO viewmodel stored in a file named Address.cs:
namespace WebApplication1.ViewModels
{
    public class Address
    {
        public string Name { get; set; }
        public string Street { get; set; }
        public string City { get; set; }
        public string State { get; set; }
        public string PostalCode { get; set; }
    }
}
Nothing prevents you from using the same classes for both your viewmodel types and your business model types. However, using separate models allows your views to vary independently from the business logic and data access parts of your app. Separation of models and viewmodels also offers security benefits when models use model binding and validation for data sent to the app by the user.
Weakly typed data (ViewData, [ViewData] attribute, and ViewBag)
ViewBag isn't available by default for use in Razor Pages PageModel classes.
In addition to strongly typed views, views have access to a weakly typed (also called loosely typed) collection of data. Unlike strong types, weak types (or loose types) means that you don't explicitly declare the type of data you're using. You can use the collection of weakly typed data for passing small amounts of data in and out of controllers and views.
| Passing data between a ... | Example |
|---|---|
| Controller and a view | Populating a dropdown list with data. |
| View and a layout view | Setting the <title> element content in the layout view from a view file. |
| Partial view and a view | A widget that displays data based on the webpage that the user requested. |
This collection can be referenced through either the ViewData or ViewBag properties on controllers and views. The ViewData property is a dictionary of weakly typed objects. The ViewBag property is a wrapper around ViewData that provides dynamic properties for the underlying ViewData collection. Note: Key lookups are case-insensitive for both ViewData and ViewBag.
ViewData and ViewBag are dynamically resolved at runtime. Since they don't offer compile-time type checking, both are generally more error-prone than using a viewmodel. For that reason, some developers prefer to minimally or never use ViewData and ViewBag.
ViewData
ViewData is a ViewDataDictionary object accessed through string keys. String data can be stored and used directly without the need for a cast, but you must cast other ViewData object values to specific types when you extract them. You can use ViewData to pass data from controllers to views and within views, including partial views and layouts.
The following is an example that sets values for a greeting and an address using ViewData in an action:
public IActionResult SomeAction()
{
    ViewData["Greeting"] = "Hello";
    ViewData["Address"]  = new Address()
    {
        Name = "Steve",
        Street = "123 Main St",
        City = "Hudson",
        State = "OH",
        PostalCode = "44236"
    };

    return View();
}
Work with the data in a view:
@{
    // Since Address isn't a string, it requires a cast.
    var address = ViewData["Address"] as Address;
}

@ViewData["Greeting"] World!

<address>
    @address.Name<br>
    @address.Street<br>
    @address.City, @address.State @address.PostalCode
</address>
[ViewData] attribute
Another approach that uses the ViewDataDictionary is ViewDataAttribute. Properties on controllers or Razor Page models marked with the [ViewData] attribute have their values stored and loaded from the dictionary.
In the following example, the Home controller contains a Title property marked with [ViewData]. The About method sets the title for the About view:
public class HomeController : Controller
{
    [ViewData]
    public string Title { get; set; }

    public IActionResult About()
    {
        Title = "About Us";
        ViewData["Message"] = "Your application description page.";

        return View();
    }
}
In the layout, the title is read from the ViewData dictionary:
<!DOCTYPE html>
<html lang="en">
<head>
    <title>@ViewData["Title"] - WebApplication</title>
    ...
ViewBag
ViewBag isn't available by default for use in Razor Pages PageModel classes.
ViewBag is a Microsoft.AspNetCore.Mvc.ViewFeatures.Internal.DynamicViewData object that provides dynamic access to the objects stored in ViewData. ViewBag can be more convenient to work with, since it doesn't require casting. The following example shows how to use ViewBag with the same result as using ViewData above:
public IActionResult SomeAction()
{
    ViewBag.Greeting = "Hello";
    ViewBag.Address  = new Address()
    {
        Name = "Steve",
        Street = "123 Main St",
        City = "Hudson",
        State = "OH",
        PostalCode = "44236"
    };

    return View();
}
@ViewBag.Greeting World!

<address>
    @ViewBag.Address.Name<br>
    @ViewBag.Address.Street<br>
    @ViewBag.Address.City, @ViewBag.Address.State @ViewBag.Address.PostalCode
</address>
Using ViewData and ViewBag simultaneously
ViewBag isn't available by default for use in Razor Pages PageModel classes.
Since ViewData and ViewBag refer to the same underlying ViewData collection, you can use both ViewData and ViewBag and mix and match between them when reading and writing values.
Set the title using ViewBag and the description using ViewData at the top of an About.cshtml view:
@{
    Layout = "/Views/Shared/_Layout.cshtml";
    ViewBag.Title = "About Contoso";
    ViewData["Description"] = "Let us tell you about Contoso's philosophy and mission.";
}
Read the properties but reverse the use of ViewData and ViewBag. In the _Layout.cshtml file, obtain the title using ViewData and obtain the description using ViewBag:
<!DOCTYPE html>
<html lang="en">
<head>
    <title>@ViewData["Title"]</title>
    <meta name="description" content="@ViewBag.Description">
    ...
Remember that strings don't require a cast for ViewData. You can use @ViewData["Title"] without casting.
Using both ViewData and ViewBag at the same time works, as does mixing and matching reading and writing the properties. The following markup is rendered:
<!DOCTYPE html>
<html lang="en">
<head>
    <title>About Contoso</title>
    <meta name="description" content="Let us tell you about Contoso's philosophy and mission.">
    ...
Summary of the differences between ViewData and ViewBag
ViewBag isn't available by default for use in Razor Pages PageModel classes.
ViewData- Derives from ViewDataDictionary, so it has dictionary properties that can be useful, such as
ContainsKey,Add,Remove, andClear. - Keys in the dictionary are strings, so whitespace is allowed. Example:
ViewData["Some Key With Whitespace"] - Any type other than a
stringmust be cast in the view to useViewData.
- Derives from ViewDataDictionary, so it has dictionary properties that can be useful, such as
ViewBag- Derives from
Microsoft.AspNetCore.Mvc.ViewFeatures.Internal.DynamicViewData, so it allows the creation of dynamic properties using dot notation (@ViewBag.SomeKey = <value or object>), and no casting is required. The syntax ofViewBagmakes it quicker to add to controllers and views. - Simpler to check for null values. Example:
@ViewBag.Person?.Name
- Derives from
When to use ViewData or ViewBag
Both ViewData and ViewBag are equally valid approaches for passing small amounts of data among controllers and views. The choice of which one to use is based on preference. You can mix and match ViewData and ViewBag objects, however, the code is easier to read and maintain with one approach used consistently. Both approaches are dynamically resolved at runtime and thus prone to causing runtime errors. Some development teams avoid them.
Dynamic views
Views that don't declare a model type using @model but that have a model instance passed to them (for example, return View(Address);) can reference the instance's properties dynamically:
<address>
    @Model.Street<br>
    @Model.City, @Model.State @Model.PostalCode<br>
    <abbr title="Phone">P:</abbr> 425.555.0100
</address>
This feature offers flexibility but doesn't offer compilation protection or IntelliSense. If the property doesn't exist, webpage generation fails at runtime.
More view features
Tag Helpers make it easy to add server-side behavior to existing HTML tags. Using Tag Helpers avoids the need to write custom code or helpers within your views. Tag helpers are applied as attributes to HTML elements and are ignored by editors that can't process them. This allows you to edit and render view markup in a variety of tools.
Generating custom HTML markup can be achieved with many built-in HTML Helpers. More complex user interface logic can be handled by View Components. View components provide the same SoC that controllers and views offer. They can eliminate the need for actions and views that deal with data used by common user interface elements.
Like many other aspects of ASP.NET Core, views support dependency injection, allowing services to be injected into views.
CSS isolation
Isolate CSS styles to individual pages, views, and components to reduce or avoid:
- Dependencies on global styles that can be challenging to maintain.
- Style conflicts in nested content.
To add a scoped CSS file for a page or view, place the CSS styles in a companion .cshtml.css file matching the name of the .cshtml file. In the following example, an Index.cshtml.css file supplies CSS styles that are only applied to the Index.cshtml page or view.
Pages/Index.cshtml.css (Razor Pages) or Views/Index.cshtml.css (MVC):
h1 {
    color: red;
}
CSS isolation occurs at build time. The framework rewrites CSS selectors to match markup rendered by the app's pages or views. The rewritten CSS styles are bundled and produced as a static asset, {APP ASSEMBLY}.styles.css. The placeholder {APP ASSEMBLY} is the assembly name of the project. A link to the bundled CSS styles is placed in the app's layout.
In the <head> content of the app's Pages/Shared/_Layout.cshtml (Razor Pages) or Views/Shared/_Layout.cshtml (MVC), add or confirm the presence of the link to the bundled CSS styles:
<link rel="stylesheet" href="~/{APP ASSEMBLY}.styles.css" />
In the following example, the app's assembly name is WebApp:
<link rel="stylesheet" href="WebApp.styles.css" />
The styles defined in a scoped CSS file are only applied to the rendered output of the matching file. In the preceding example, any h1 CSS declarations defined elsewhere in the app don't conflict with the Index's heading style. CSS style cascading and inheritance rules remain in effect for scoped CSS files. For example, styles applied directly to an <h1> element in the Index.cshtml file override the scoped CSS file's styles in Index.cshtml.css.
Note
In order to guarantee CSS style isolation when bundling occurs, importing CSS in Razor code blocks isn't supported.
CSS isolation only applies to HTML elements. CSS isolation isn't supported for Tag Helpers.
Within the bundled CSS file, each page, view, or Razor component is associated with a scope identifier in the format b-{STRING}, where the {STRING} placeholder is a ten-character string generated by the framework. The following example provides the style for the preceding <h1> element in the Index page of a Razor Pages app:
/* /Pages/Index.cshtml.rz.scp.css */
h1[b-3xxtam6d07] {
    color: red;
}
In the Index page where the CSS style is applied from the bundled file, the scope identifier is appended as an HTML attribute:
<h1 b-3xxtam6d07>
The identifier is unique to an app. At build time, a project bundle is created with the convention {STATIC WEB ASSETS BASE PATH}/Project.lib.scp.css, where the placeholder {STATIC WEB ASSETS BASE PATH} is the static web assets base path.
If other projects are utilized, such as NuGet packages or Razor class libraries, the bundled file:
- References the styles using CSS imports.
- Isn't published as a static web asset of the app that consumes the styles.
CSS preprocessor support
CSS preprocessors are useful for improving CSS development by utilizing features such as variables, nesting, modules, mixins, and inheritance. While CSS isolation doesn't natively support CSS preprocessors such as Sass or Less, integrating CSS preprocessors is seamless as long as preprocessor compilation occurs before the framework rewrites the CSS selectors during the build process. Using Visual Studio for example, configure existing preprocessor compilation as a Before Build task in the Visual Studio Task Runner Explorer.
Many third-party NuGet packages, such as AspNetCore.SassCompiler, can compile SASS/SCSS files at the beginning of the build process before CSS isolation occurs, and no additional configuration is required.
CSS isolation configuration
CSS isolation permits configuration for some advanced scenarios, such as when there are dependencies on existing tools or workflows.
Customize scope identifier format
In this section, the {Pages|Views} placeholder is either Pages for Razor Pages apps or Views for MVC apps.
By default, scope identifiers use the format b-{STRING}, where the {STRING} placeholder is a ten-character string generated by the framework. To customize the scope identifier format, update the project file to a desired pattern:
<ItemGroup>
  <None Update="{Pages|Views}/Index.cshtml.css" CssScope="custom-scope-identifier" />
</ItemGroup>
In the preceding example, the CSS generated for Index.cshtml.css changes its scope identifier from b-{STRING} to custom-scope-identifier.
Use scope identifiers to achieve inheritance with scoped CSS files. In the following project file example, a BaseView.cshtml.css file contains common styles across views. A DerivedView.cshtml.css file inherits these styles.
<ItemGroup>
  <None Update="{Pages|Views}/BaseView.cshtml.css" CssScope="custom-scope-identifier" />
  <None Update="{Pages|Views}/DerivedView.cshtml.css" CssScope="custom-scope-identifier" />
</ItemGroup>
Use the wildcard (*) operator to share scope identifiers across multiple files:
<ItemGroup>
  <None Update="{Pages|Views}/*.cshtml.css" CssScope="custom-scope-identifier" />
</ItemGroup>
Change base path for static web assets
The scoped CSS file is generated at the root of the app. In the project file, use the StaticWebAssetBasePath property to change the default path. The following example places the scoped CSS file, and the rest of the app's assets, at the _content path:
<PropertyGroup>
  <StaticWebAssetBasePath>_content/$(PackageId)</StaticWebAssetBasePath>
</PropertyGroup>
Disable automatic bundling
To opt out of how framework publishes and loads scoped files at runtime, use the DisableScopedCssBundling property. When using this property, other tools or processes are responsible for taking the isolated CSS files from the obj directory and publishing and loading them at runtime:
<PropertyGroup>
  <DisableScopedCssBundling>true</DisableScopedCssBundling>
</PropertyGroup>
Razor class library (RCL) support
When a Razor class library (RCL) provides isolated styles, the <link> tag's href attribute points to {STATIC WEB ASSET BASE PATH}/{PACKAGE ID}.bundle.scp.css, where the placeholders are:
{STATIC WEB ASSET BASE PATH}: The static web asset base path.{PACKAGE ID}: The library's package identifier. The package identifier defaults to the project's assembly name if the package identifier isn't specified in the project file.
In the following example:
- The static web asset base path is
_content/ClassLib. - The class library's assembly name is
ClassLib.
Pages/Shared/_Layout.cshtml (Razor Pages) or Views/Shared/_Layout.cshtml (MVC):
<link href="_content/ClassLib/ClassLib.bundle.scp.css" rel="stylesheet">
For more information on RCLs, see the following articles:
- Reusable Razor UI in class libraries with ASP.NET Core
- Consume ASP.NET Core Razor components from a Razor class library (RCL)
For information on Blazor CSS isolation, see ASP.NET Core Blazor CSS isolation.
ASP.NET Core
Feedback
Coming soon: Throughout 2024 we will be phasing out GitHub Issues as the feedback mechanism for content and replacing it with a new feedback system. For more information see: https://aka.ms/ContentUserFeedback.
Submit and view feedback for